Things have been super busy around here!!! Yes, life with a baby and a toddler is pretty fast paced, but we are having a great time! In between laundry, dishes, bottles, feedings, naps, MDO, and play time, I try to find a few moments here and there to do something fun and creative!
Especially after I printed my Instagram pictures, I've been having a great time sticking them in my Smash books!!! I'm up to 3 of those bad boys, now! My red one is for me and just random stuff, the teal one is Livie's baby book, and the black one is Tuckers, which started out as a way to help him learn Scriptures, but I'm adding in his stuff, too!
I found this little quote on Pinterest, and knew it was the perfect first page for his book!
These next two pages are probably my favorites right now!!! They are in my red book, and they are just so fun and colorful!...very me, no?! :)
This next piece is not in a Smash book, but rather a card that I made and sent as part of a Love Notes project that I did! I mailed this little gem to Heidi, who was my pen pal for 3 weeks :) I hope she liked it!
And, I'll leave you with this picture! I walked into Hobby Lobby a while back and this beauty smacked me in the face on the way in!!! I think someone had me in mind when they made this couch! How cute are those chevron pillows, too?!
My dad, who never seizes to amaze me in his ever growing knowledge of girl things (he has lived most of his life in a house full of girls. We were bound to make an impact on him at some point! :), said, "You'd have to have everything else in that room be very plain in order for that couch to work!" LOL!!! SO true, Dad! Good eye, good eye. :)
Well, it's 9:45, so way past my bed time these days! I hope you enjoyed this little update! :)
Showing posts with label projects. Show all posts
Wednesday, April 17, 2013
Wednesday, December 12, 2012
Christmas Wrapping Paper DIY
I have always loved the plethora of options for beautiful wrapping paper at Christmas time! I love choosing a color theme to use on my gifts, and love wrapping each one with anticipation of the joy that the recipient will feel when they unwrap it! I actually bought a roll of double sided paper at Sam's 5 years ago when we first got married, and I STILL have it!!!
This year, after a few pinterest pins, I planned on keeping things simple. I was going to use up some old yarn, and try a plain look...which I did...until I had an idea!!!!
My brown packages looked a little bare, so I thought I'd recruit a certain 2 year old to help me with my task!
So, here's what you'll need:
1. Brown packaging paper- I got mine at the Dollar Tree, which I totally love!
2. Paint- you can use craft paint, or I used Crayola washable since T Man was the one painting
3. Bright yarn or ribbon
4. Stickers
5. Gift tags
Once the package was wrapped, I let T go to town with the paint. Since red and green are complimentary colors (meaning they are opposite on the color wheel...meaning if you mix them, they make brown :/ yuck), I had him start with green and white.
Immediately after the green and white paint (because he's 2 and has a short attention span :), he got to choose stickers and apply to the box. We talked about who the gift was for, and what sticker he would like to put on their package. This was his favorite part. He LOVES stickers, and remembers who he picked them for!!!
Once the green and white paint was dry, we added pink and red. He really likes using 2 colors at a time, and it really brightened the boxes!!!
When they were all finished, I added the yarn and the gift tag. I love the adorable little tags that I found at Hobby Lobby!!!
Having T help me with the wrapping has made each gift even more special. I also love seeing his excitement over the finished package!!! He showed Daddy his package with great joy when he got home from work, and Andy was pretty thrilled, too :D
This year, after a few pinterest pins, I planned on keeping things simple. I was going to use up some old yarn, and try a plain look...which I did...until I had an idea!!!!
My brown packages looked a little bare, so I thought I'd recruit a certain 2 year old to help me with my task!
So, here's what you'll need:
1. Brown packaging paper- I got mine at the Dollar Tree, which I totally love!
2. Paint- you can use craft paint, or I used Crayola washable since T Man was the one painting
3. Bright yarn or ribbon
4. Stickers
5. Gift tags
Once the package was wrapped, I let T go to town with the paint. Since red and green are complimentary colors (meaning they are opposite on the color wheel...meaning if you mix them, they make brown :/ yuck), I had him start with green and white.
Immediately after the green and white paint (because he's 2 and has a short attention span :), he got to choose stickers and apply to the box. We talked about who the gift was for, and what sticker he would like to put on their package. This was his favorite part. He LOVES stickers, and remembers who he picked them for!!!
Once the green and white paint was dry, we added pink and red. He really likes using 2 colors at a time, and it really brightened the boxes!!!
When they were all finished, I added the yarn and the gift tag. I love the adorable little tags that I found at Hobby Lobby!!!
Having T help me with the wrapping has made each gift even more special. I also love seeing his excitement over the finished package!!! He showed Daddy his package with great joy when he got home from work, and Andy was pretty thrilled, too :D
Monday, December 10, 2012
Paper Trees Tutorial
This year I am making all of T Man's teacher's Christmas gifts! He has such wonderful women in his life who are coming along side of us to mold and shape him into the man he will be, and I am SO thankful for all of the love they shower on him! He LOVES going to school and Bible study, and is just a little sponge!!!
Ok, onto the project!!! This year, I made Christmas hangers for his Bible study teachers to hang in their home! The best part was, I already had all of my supplies!!!
Here's what you'll need:
1. 11x14 canvas or canvas board. 8x10 would also be a good size!
2. Scrap paper! I used pages from old wall paper books that my mom has.
3. Fabric scraps...I liked that there was a change in texture on the tree.
4. Mod Podge
5. Staple gun
6. Ribbon
7. Sharpie or paint pen
First, cut your paper/fabric into different sized strips. Next, apply a thin layer of Mod Podge to your background paper, and attach it to your canvas. Be sure to apply pressure all over for about a minute to work out any wrinkles or air bubbles that might occur.
Once your background is attached, lay our your fabric and paper scraps on top. Your tree does not have to be a perfect triangle, or even go straight up! The more you place your pieces a little "less perfect," the more whimsical it will look!!! Once you like the placement, stick them on there with another layer of Mod Podge! Don't forget to add your star at the top! :)
As a final touch, I added the family's name to the canvas to personalize it. With or without this step makes these canvases a great holiday decoration!
Ok, onto the project!!! This year, I made Christmas hangers for his Bible study teachers to hang in their home! The best part was, I already had all of my supplies!!!
Here's what you'll need:
1. 11x14 canvas or canvas board. 8x10 would also be a good size!
2. Scrap paper! I used pages from old wall paper books that my mom has.
3. Fabric scraps...I liked that there was a change in texture on the tree.
4. Mod Podge
5. Staple gun
6. Ribbon
7. Sharpie or paint pen
First, cut your paper/fabric into different sized strips. Next, apply a thin layer of Mod Podge to your background paper, and attach it to your canvas. Be sure to apply pressure all over for about a minute to work out any wrinkles or air bubbles that might occur.
Once your background is attached, lay our your fabric and paper scraps on top. Your tree does not have to be a perfect triangle, or even go straight up! The more you place your pieces a little "less perfect," the more whimsical it will look!!! Once you like the placement, stick them on there with another layer of Mod Podge! Don't forget to add your star at the top! :)
As a final touch, I added the family's name to the canvas to personalize it. With or without this step makes these canvases a great holiday decoration!
Thursday, May 24, 2012
Recent Customs
I wanted to share some custom pieces that I've created recently for clients. Some sweet friends of ours who we met in birthing class had twin boys a few months ago! Their daughter was born about a month before T-man, and we were excited to celebrate their new additions!
These are 2x4 foot canvases, and I just love how they turned out! My favorite part was that the names were entrusted to me before the boys were born! I was sworn to secrecy, and kept my lips sealed!
This next mural was for a friend of a friend! I fell in love with this nursery the moment I walked in!!! The beautiful lilac color was so calming and gorgeous! Once again, since we were doing a monogram, I was entrusted with the name of this little one!!! Now that she's here, I know sweet Nora must love her gorgeous room!
And, this is Winter's nursery! Again, this was a friend of a friend, and her nursery totally fit this couple!!! I have gotten so many compliments on this adorable little tree, and the coordinating pink furniture!!!
I had to hold on to a lot of these photos until the babies were born, but now that they're all here, I wanted to share!!! Hope you enjoy!
These are 2x4 foot canvases, and I just love how they turned out! My favorite part was that the names were entrusted to me before the boys were born! I was sworn to secrecy, and kept my lips sealed!
This next mural was for a friend of a friend! I fell in love with this nursery the moment I walked in!!! The beautiful lilac color was so calming and gorgeous! Once again, since we were doing a monogram, I was entrusted with the name of this little one!!! Now that she's here, I know sweet Nora must love her gorgeous room!
And, this is Winter's nursery! Again, this was a friend of a friend, and her nursery totally fit this couple!!! I have gotten so many compliments on this adorable little tree, and the coordinating pink furniture!!!
I had to hold on to a lot of these photos until the babies were born, but now that they're all here, I wanted to share!!! Hope you enjoy!
Thursday, February 2, 2012
You've Got Mail
I'm talking to you, Brooklyn Art Library!
Mom and I really pushed it to the last minute this year with our sketchbooks for The Sketchbook Project 2012! We mailed them on the deadline day!!!! :/ And, in perfect "us" style, we documented the whole thing :)
Don't our covers look great?! Here's a closer look at our books.
Let's start with Mom! I'm SOOOOOOO proud of her book!!! Since I was little, I remember her talking on the phone and doodling these beautiful little women all over her notes page. She recently began creating more expansive drawings of these woman, and I think she has really found her style! Each page of her book screams her spirit, love of art, and attention to detail! Here's her front cover:
Mom chose the theme "Encyclopedia of..." And her's is "Encyclopedia of Filet." You'll have to read her sketchbook, but basically, "filet" is what our family calls the best of the best. I believe a more common example would be "Cadilac." Can you find her title in the books?! :)
Wait, who's this fancy girl?! She seems so artsy, so cool, so...everything! Oh, wait, that's me! ;)
This is one of my favorite pages. I can't believe she did all of that pen detail by hand on the left!
This next picture is mom's fav. This lady is so super cool!!!
And, this is the Resort! If you look closely, there are so many details specific to The Resort!
And, this is the back cover.
Great job, Mom!
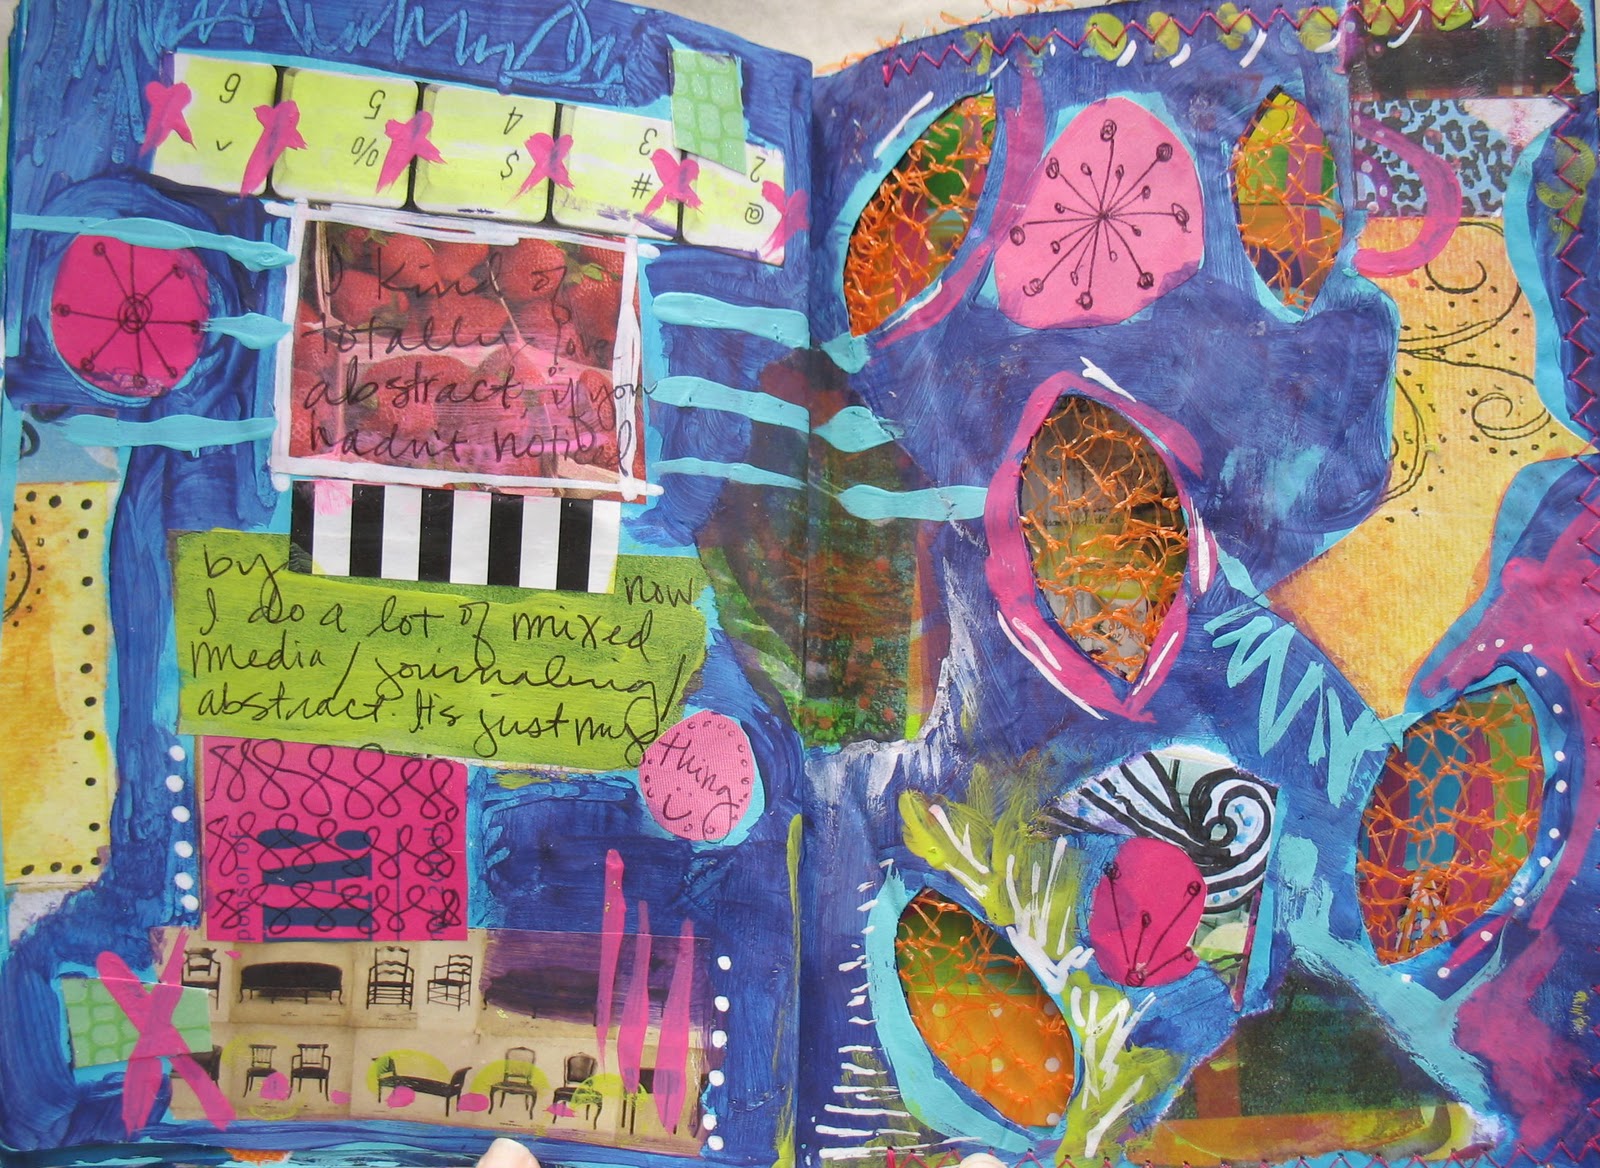
Here is the inside cover of my sketchbook. You can see the sewn collage through the leaves when the book is closed! I chose the theme, "Folds and Stitches," but the full title of my book is "Holes and Folds and Stitches and Stuff." :)
I feel like there's not a whole to explain about my pages. There is just a wide variety of my mixed media and collaging.
There are cut out leaves in the middle of these spreads with an orange netting in between them :)
Ta-Da! My book!
So, Tuesday morning, I met up with Mom to mail our packages. She was super cute and did adorable drawings on her envelope!
Mine was lame and super boring :/ :)
Anyways, we packaged them up,
And headed to the post office!
The guy ringing us up was extremely patient...especially when we struck up an extensive conversation with the sweet lady behind us, who was actually taking this picture! She has 5 kids- 3 of which are triplets! Anyways, back to the story :)
We were SO excited to have sent our books in on time! Truthfully, I was just thankful that I completed it in time!!! (p.s. Zoom in on this picture. My face is pretty hilarious!)
Thanks, Mom, for doing this project with me! I love that we do this together, and I can't wait to go visit all of our books in years to come at the Brooklyn Art Library!!! :)
Mom and I really pushed it to the last minute this year with our sketchbooks for The Sketchbook Project 2012! We mailed them on the deadline day!!!! :/ And, in perfect "us" style, we documented the whole thing :)
Don't our covers look great?! Here's a closer look at our books.
Let's start with Mom! I'm SOOOOOOO proud of her book!!! Since I was little, I remember her talking on the phone and doodling these beautiful little women all over her notes page. She recently began creating more expansive drawings of these woman, and I think she has really found her style! Each page of her book screams her spirit, love of art, and attention to detail! Here's her front cover:
Mom chose the theme "Encyclopedia of..." And her's is "Encyclopedia of Filet." You'll have to read her sketchbook, but basically, "filet" is what our family calls the best of the best. I believe a more common example would be "Cadilac." Can you find her title in the books?! :)
Wait, who's this fancy girl?! She seems so artsy, so cool, so...everything! Oh, wait, that's me! ;)
This is one of my favorite pages. I can't believe she did all of that pen detail by hand on the left!
This next picture is mom's fav. This lady is so super cool!!!
And, this is the Resort! If you look closely, there are so many details specific to The Resort!
And, this is the back cover.
Great job, Mom!
Here is the inside cover of my sketchbook. You can see the sewn collage through the leaves when the book is closed! I chose the theme, "Folds and Stitches," but the full title of my book is "Holes and Folds and Stitches and Stuff." :)
I feel like there's not a whole to explain about my pages. There is just a wide variety of my mixed media and collaging.
There are cut out leaves in the middle of these spreads with an orange netting in between them :)
Ta-Da! My book!
So, Tuesday morning, I met up with Mom to mail our packages. She was super cute and did adorable drawings on her envelope!
Mine was lame and super boring :/ :)
Anyways, we packaged them up,
And headed to the post office!
The guy ringing us up was extremely patient...especially when we struck up an extensive conversation with the sweet lady behind us, who was actually taking this picture! She has 5 kids- 3 of which are triplets! Anyways, back to the story :)
We were SO excited to have sent our books in on time! Truthfully, I was just thankful that I completed it in time!!! (p.s. Zoom in on this picture. My face is pretty hilarious!)
Thanks, Mom, for doing this project with me! I love that we do this together, and I can't wait to go visit all of our books in years to come at the Brooklyn Art Library!!! :)
Labels:
artist journal,
mixed media,
projects,
Sketchbook Project 2012
Tuesday, October 25, 2011
afternoon painting
We've been living in our house for about 4 years now. I love my house, but I am ready for a few slight changes to keep things feeling fresh. After I finished the place mats, I decided that the painting in the kitchen needed a bit of an update.
The colors are pretty, but I got very inspired by Mati Rose, and wanted to try to experiment with her style. So, the cover up began.
I did leave some of the pieces of the original painting show through, but I also masked those pieces.
It was nice to have my easel out and paint again. I just LOVE to paint!!! I've been playing around with abstract after my class I took last spring, and really hadn't done it in a while. I think I was just in the zone because it all just kind of flowed!!! ...did I mention that I did all of this during T's nap time?!
And, ta da! The finished product!!!
It goes really well with the orange piece bellow, and it's a nice compliment to the kitchen!!!
Ahhh, to paint again! :)
I did leave some of the pieces of the original painting show through, but I also masked those pieces.
It was nice to have my easel out and paint again. I just LOVE to paint!!! I've been playing around with abstract after my class I took last spring, and really hadn't done it in a while. I think I was just in the zone because it all just kind of flowed!!! ...did I mention that I did all of this during T's nap time?!
And, ta da! The finished product!!!
It goes really well with the orange piece bellow, and it's a nice compliment to the kitchen!!!
Ahhh, to paint again! :)
Monday, October 24, 2011
Funky Place Mat in a Day Tutorial!
I have recently been wanting a neat set of place mats. I had an idea in mind, and found some neat ones at Pier 1, but not exactly what I was looking for. Then, I found some fabrics at Goodwill and they were perfect to make my own!!!
They were a thick linen and were previously some very LARGE skirts, but I knew I could transform them!!! This is really all you need:
*fabric- a large amount to be your base, smaller amounts to cut into strips for the front.
*rick rack, ribbon, bias tape, anything snazy!!!
*pom pom ribbon.
First, I cut the base fabric (the pieces I got from Goodwill, but also 6 different scrap pieces for the back of the mats. Each back is different!) using an existing place mat.
Next, I cut scrap fabrics into strips and searched through my ribbon, rick rack and other goodies to find additional stripes.
I played around with the arrangements until I liked how each mat would look.
Notice that there's a separate back fabric with each set.
Next, I ironed the edges of each of the strips and began sewing them to the top of the place mat (don't connect the back piece yet, or you'll see all of your stitches on the back side...unless you like that!)
Don't be afraid to play around with all of those stitch options on your machine! I used almost all of them to add a bit of *pizazz!!!* I also used a variety of thread colors to add more interest.
*It's also good to have some moral support through your project. T was very interested in the machine that made weird noises!
Don't worry if your lines are straight, or if the fabric isn't perfect, these are FUNKY place mats! They're not meant to be perfect! Just have fun with this project!!!
Once your front side is sewn, iron the edges of your top and bottom pieces so they they will match. Pin your pom pom ribbon into the sides, and begin sewing away! I used a small zig zag stitch for this step to give me a bit more wiggle room for making sure I sewed that pom pom ribbon in really well.
Again, more moral support. T was sleeping, so Sookie stepped in for this tedious process...well, not so much tedious as super exciting because I wanted to see the finished product!
And, let me tell you, it was worth the wait!!! I LOVE how these turned out!!!
No two are the same, and each has a different pom pom color and backing!
They just looked so adorable with my dishes and kitchen!
I think we'll be eating at the table a lot more now :)
Happy sewing!!!
Subscribe to:
Posts (Atom)


