Monday, October 24, 2011
Funky Place Mat in a Day Tutorial!
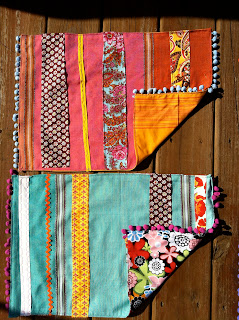
I have recently been wanting a neat set of place mats. I had an idea in mind, and found some neat ones at Pier 1, but not exactly what I was looking for. Then, I found some fabrics at Goodwill and they were perfect to make my own!!!
They were a thick linen and were previously some very LARGE skirts, but I knew I could transform them!!! This is really all you need:
*fabric- a large amount to be your base, smaller amounts to cut into strips for the front.
*rick rack, ribbon, bias tape, anything snazy!!!
*pom pom ribbon.
First, I cut the base fabric (the pieces I got from Goodwill, but also 6 different scrap pieces for the back of the mats. Each back is different!) using an existing place mat.
Next, I cut scrap fabrics into strips and searched through my ribbon, rick rack and other goodies to find additional stripes.
I played around with the arrangements until I liked how each mat would look.
Notice that there's a separate back fabric with each set.
Next, I ironed the edges of each of the strips and began sewing them to the top of the place mat (don't connect the back piece yet, or you'll see all of your stitches on the back side...unless you like that!)
Don't be afraid to play around with all of those stitch options on your machine! I used almost all of them to add a bit of *pizazz!!!* I also used a variety of thread colors to add more interest.
*It's also good to have some moral support through your project. T was very interested in the machine that made weird noises!
Don't worry if your lines are straight, or if the fabric isn't perfect, these are FUNKY place mats! They're not meant to be perfect! Just have fun with this project!!!
Once your front side is sewn, iron the edges of your top and bottom pieces so they they will match. Pin your pom pom ribbon into the sides, and begin sewing away! I used a small zig zag stitch for this step to give me a bit more wiggle room for making sure I sewed that pom pom ribbon in really well.
Again, more moral support. T was sleeping, so Sookie stepped in for this tedious process...well, not so much tedious as super exciting because I wanted to see the finished product!
And, let me tell you, it was worth the wait!!! I LOVE how these turned out!!!
No two are the same, and each has a different pom pom color and backing!
They just looked so adorable with my dishes and kitchen!
I think we'll be eating at the table a lot more now :)
Happy sewing!!!
Subscribe to:
Post Comments (Atom)


i love them!! so colorful !! what r u doing up at that hour though???? i want to buy the baby??
ReplyDeletelol, I have no idea why it said I posted at 4:30 am!!! I was definitely NOT up at that hour!!!
ReplyDeleteWAY cute!
ReplyDelete