Wednesday, January 9, 2013

Painting with a Toddler- Part 1


I know that for some of you, the title of this post alone has turned you away! :) But, I really hope you stay and just check it out!!!

I have always enjoyed painting with T-Man, and probably started with him around when he was one.  Don't get too excited that this could be an afternoon project to share with your little one, because realistically, you're looking at about 5, maybe 10 minutes of fun!!!

My first suggestions, get prepared before you grab your kiddo.  They are quick grabbers, fast workers, and it will be done before you know it...and if you're not ready, you might miss the whole thing...and end up with a painted table :)

This is what I usually grab:

To ensure success, break your painting up into multiple parts- each part using analogous colors (colors that are similar because they are next to each other on the color wheel.)  Since we are making a painting for Livie's room, I chose pink, red, and fuchsia.

Also choose a LARGE brush.  Your child will cover more surface area, and this really helps when you are painting the background.

Now it's time to get this party started!!!  I gave T just pink to start with.  Ever since he has been painting, he has really preferred a Pointillism approach...meaning, he likes to hit the canvas/paper with the brush :)  ...Great for paint, ineffective with Crayons :)
Next, he actually requested the red, so I added a smaller amount to his paper plate.  Since he is working so quickly, the colors blend very well.  This creates value (lightness and darkness of a color).  You can see in the picture below how they blend nicely.  The more that he painted in an area, the more the colors blended.
*To avoid this, constantly turn their canvas/paper to help them fill all the areas.
We then added the fuchsia to the palette.  I chose this color because it matched a painting I created for her room (see below), and was a pretty shade to go with the pink and red.
Once he had covered a good bit of the canvas, we set it back to dry.  I think leaving some white space on the canvas gives as much interest as using multiple paint colors to create value.

Below is the picture that I made for her room!  It is both paint and fabric, and I LOVE how it turned out! I think I'll be painting the frame white, what do you think?!
Be sure to stop back by for Part 2, where we'll be adding a second set of colors to the base of our painting!!  Enjoy painting with your toddler! :)

Tuesday, January 1, 2013

New Years Goals


I saw this on Pinterest today, and loved it!!!  I couldn't agree more!!!

Art is my outlet.  It takes me away to a different place and eases the stresses of life.  I can complete something. See results.  Make a finished product.  It soothes me and gives me a sense of completion.

So, my New Year Resolution? 

Make. Art...a lot.
By myself.
With others.
For just a few minutes.
With my kids.
Just. Make Art. :)

Happy 2013!

Wednesday, December 19, 2012

And she shall be called...

Baby Girl finally has a name!!!  We're so excited for her to be here!

Wednesday, December 12, 2012

Christmas Wrapping Paper DIY

I have always loved the plethora of options for beautiful wrapping paper at Christmas time!  I love choosing a color theme to use on my gifts, and love wrapping each one with anticipation of the joy that the recipient will feel when they unwrap it!  I actually bought a roll of double sided paper at Sam's 5 years ago when we first got married, and I STILL have it!!!

This year, after a few pinterest pins, I planned on keeping things simple.  I was going to use up some old yarn, and try a plain look...which I did...until I had an idea!!!!

My brown packages looked a little bare, so I thought I'd recruit a certain 2 year old to help me with my task!
So, here's what you'll need:
1. Brown packaging paper- I got mine at the Dollar Tree, which I totally love!
2. Paint- you can use craft paint, or I used Crayola washable since T Man was the one painting
3. Bright yarn or ribbon
4. Stickers
5. Gift tags
Once the package was wrapped, I let T go to town with the paint.  Since red and green are complimentary colors (meaning they are opposite on the color wheel...meaning if you mix them, they make brown :/ yuck), I had him start with green and white.

Immediately after the green and white paint (because he's 2 and has a short attention span :), he got to choose stickers and apply to the box.  We talked about who the gift was for, and what sticker he would like to put on their package.  This was his favorite part.  He LOVES stickers, and remembers who he picked them for!!!
Once the green and white paint was dry, we added pink and red.  He really likes using 2 colors at a time, and it really brightened the boxes!!!
When they were all finished, I added the yarn and the gift tag.  I love the adorable little tags that I found at Hobby Lobby!!! 
Having T help me with the wrapping has made each gift even more special.  I also love seeing his excitement over the finished package!!!  He showed Daddy his package with great joy when he got home from work, and Andy was pretty thrilled, too :D

Monday, December 10, 2012

Paper Trees Tutorial

This year I am making all of T Man's teacher's Christmas gifts!  He has such wonderful women in his life who are coming along side of us to mold and shape him into the man he will be, and I am SO thankful for all of the love they shower on him!  He LOVES going to school and Bible study, and is just a little sponge!!!

Ok, onto the project!!!  This year, I made Christmas hangers for his Bible study teachers to hang in their home!  The best part was, I already had all of my supplies!!!
Here's what you'll need:
1. 11x14 canvas or canvas board.  8x10 would also be a good size!
2. Scrap paper!  I used pages from old wall paper books that my mom has.
3. Fabric scraps...I liked that there was a change in texture on the tree.
4. Mod Podge
5. Staple gun
6. Ribbon
7. Sharpie or paint pen
First, cut your paper/fabric into different sized strips.  Next, apply a thin layer of Mod Podge to your background paper, and attach it to your canvas.  Be sure to apply pressure all over for about a minute to work out any wrinkles or air bubbles that might occur.

Once your background is attached, lay our your fabric and paper scraps on top.  Your tree does not have to be a perfect triangle, or even go straight up!  The more you place your pieces a little "less perfect," the more whimsical it will look!!!  Once you like the placement, stick them on there with another layer of Mod Podge!  Don't forget to add your star at the top! :)

As a final touch, I added the family's name to the canvas to personalize it.  With or without this step makes these canvases a great holiday decoration!

Wednesday, October 24, 2012

Tape it up!

Yesterday, T Man brought home a goodie bag from one of the girls in his MDO class for her birthday. Among the normal party favors was this tiny roll of tape! Upon closer inspection, it had little girls on it!!!!

I immediately emailed her mom to find out where she had found such a treasure!!! Turns out, her mom shares a love for craft tape, too, and said she had found it at Meijer!

Obviously, I had to go there. :) T and I headed over to explore after bible study, and while searching for the small 6 pack, I found this!
 
 Can you believe it?! 30 of these adorable rolls, 9 ft each!!!

Among my favorites are the houndstooth, Japanese dolls, and the zebra print!!! This big box was a MUCH better deal than the six pack, so I got this and will be sharing with mom. :)

Be sure to check them out! They are SO cute!!!

Wednesday, October 10, 2012

Smash Baby Book

Hey! It's been a while, and I haven't shared my good news with you yet! We will be welcoming a baby GIRL to our family on Valentines Day! We are so excited! I have had SO many ideas rolling around in my head, hence my giant Pinterest Board, and this is one that most recently popped in!

I have been super fascinated by the whole Smash Book idea, and actually have 2 of the books already! I can't seem to help myself when at the craft stores, and am drawn to them like a moth to a flame!  When I saw their new Baby book, I thought, what a better way to make a baby book for her than to make a baby book for her!

After flipping through their Baby themed book, I decided that it really wasn't for me, and chose to go with the Retro theme instead.  I love the color palette, and a lot of the pages can be made to fit a baby book, in a quirky sort of way, of course! :)
As soon as T Man went down for his nap today, I cracked this thing open!!! I had so many ideas floating around (call it nesting, if you will :D), that I had to get started!!! I began painting the front cover, but since that isn't done yet, I'll save it for a later post!

Sorry this next photo is flipped! :/  I've got some of her ultrasound pics on the left, and the inside right side of the cover will have her name and her life verse :)

This next spread has the church bulletin from when we thought of her name!  We're not fully decided that this is her name, yet, but we both seem to love it!  It's a great story that I will share later, and I'm glad I kept the bulletin for her book! :)

This goofy little guy on the right will be covered up by a picture of her on the day she is born.  Under it it says, "You would protect this pretty face too."  LOL!  See, not a baby book, but fits in a quirky sort of way!  The left has spots for all of her birth info, and names of those who came to meet her!
I love this next page!  I added a clear envelope to put our hospital bracelets in, since T's are just floating around his book! I don't want them to get lost!  The rest of her ultrasound pics are on the right, and I can add other special hospital things into that pocket, too!

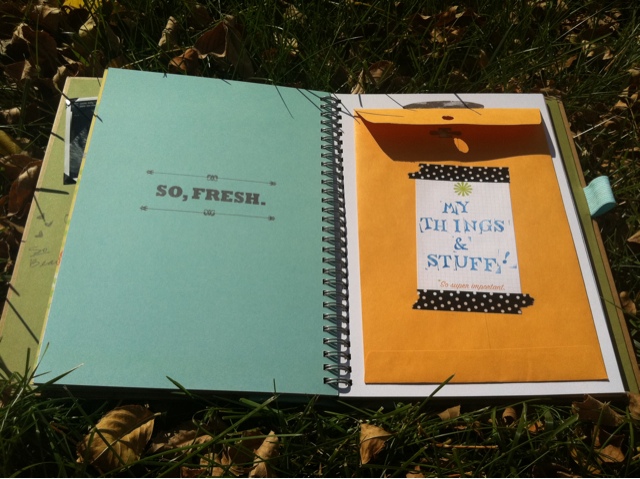
Here are a few more pockets, because, let's face it, we all have things and stuff that we love and don't want to loose!  I hope she'll put fun little items in these :)

And lastly, one of my favorite details!  My mom found this kit at a little stationary shop in Chicago during our Sketchbook Project Vaca.  It had a Library Card set in it!  Since they're basically extinct these days, we were falling over ourselves excited at this little treat!  I happened to find them when I was looking for something else today, so I added it to the last page of the book!!! :D  I have a date stamp, so I'm going to add today's date, my Sprinkle date, her birthday, and then let her fill in the rest!  SO fun!!!
I've had so much fun working on this book so far!  I can't wait to add pictures of her and T when she's born!  Once we pick her name and I make the front, I'll share as well! :)